If you’re new or intermediate to dice making, I’m sure you’ve heard of pressure pots and vacuum chambers quite a lot. What are they and what do they do? Do you need them to make dice? What’s the difference between them? And do you need both?
The short answer is no. You don’t need either of these things to make dice that you will enjoy and can use in your games.
But if you want clear, bubble free, and professional looking dice? You’re gonna have to invest.
(This post contains affiliate links, which means that if you choose to make any purchases through one of the provided links, aelestridcrafts.com may get a small portion of this sale. This does not cost you anything extra and helps to support site costs.)
So what is the difference between a pressure pot and a vacuum chamber?
To start with, a vacuum chamber is a device that sucks the air out of resin, silicone, and other materials that tend to have a lot of air bubbles trapped in them. A pressure pot is a device that pressurizes the air into microscopic (and thus undetectable) amounts such that the result is virtually bubble-free casts. Both, on the face of it, do the same thing: remove visible air bubbles from your casts. And they do, sort of, albeit in different ways.
Out of the box, you’ll need a vacuum chamber (one gallon will be fine but if you choose to have more vertical space you can get a larger one); a pump (the one I ordered from Amazon has the pump included); and vacuum pump oil (again I got mine on Amazon). When you get it, you’ll hook up your pump to the vacuum chamber and make sure you’ve included enough oil according to the guidelines, and you’re ready to go.
The pressure pot takes a little more work. Many choose to go with the Harbor Freight paint tank and modify it themselves as it’s the cheaper option (don’t forget to search for their current 20% off coupon before you do). There are a ton of youtube videos out there that explain how to modify the pot, but the basics are that you need a ball valve that controls access to the air getting into the tank from your pump, a safety release valve that lets air out and prevents your tank from getting over-pressurized, and various caps and fittings. While I bought some of the stuff from Harbor Freight directly (the ball valve) and other parts came with the pot, the safety valve was one thing worth upgrading because the one that came with the pot was a big leaker.
It’s hard for me to recommend buying all the fittings on Amazon because often you’ll order the wrong size or receive the wrong thing by mistake, and it ends up being a week or two of trial and error and running to the hardware store. Check your preferred youtube video for a list of parts they recommend and where to buy them. (I found ManCraftingTM’s video to be the easiest to understand but Rybonator and Zac Higgins have good ones too.) I linked the safety valve above because it took me some hunting to realize that often the one that is included with Harbor Freight’s pot isn’t great.
Beyond getting the parts and setting up the pot, you’ll need the pump. This one varies, because some pumps are super loud or expensive. It depends on what you need for your environment. I bought a connector for a bike pump (yeah, if you have a bike pump on hand you can use that if you don’t mind the work) but found out that we had an electric tire pump on hand so I just used that. Some choose to also buy their pump through Harbor Freight but you can look around at hardware stores. Unfortunately the vacuum pump and the pressure pot pump are different and cannot be used interchangeably.
So which should you get, and do you need both?
Many people see the price tags and hassle of the pressure pot and think getting a vacuum chamber is the better bet. And you know what? That’s exactly what I did. I mean, you can degas silicone and resin in a vacuum chamber, so why not use it for both? It’s cheaper and way less hassle.
Butttt…..
Let me show you why if you’re going to get just one, the pressure pot is the way to go.
Here’s my vacuum chamber in action, degassing Sorta Clear 12 silicone for molds, which is really where it shines. (By the way, because I vacuum degassed my molds before ever using them in a pressure pot I had no problems with ruined molds or casts, but if you have not degassed your silicone and you try putting them in a pressure pot for the first time, you might run into issues, so be sure to pressurize your molds in your pressure pot as they are curing like you would with your resin if you don’t have a vacuum chamber.)
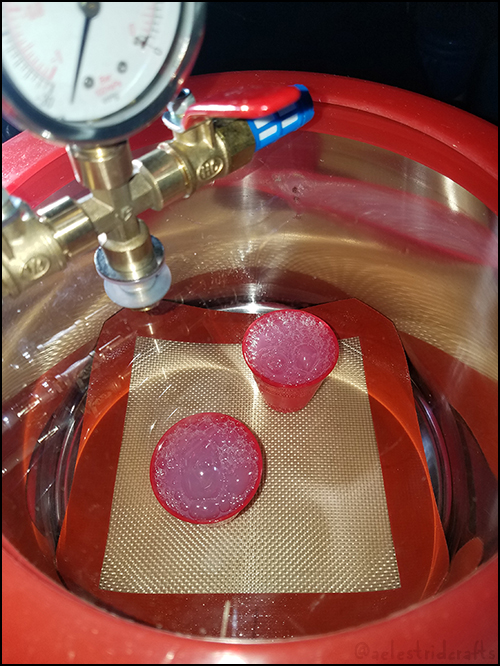
My process for doing this with resin was the following. I used Art N Glow epoxy which has a pot life of 40 minutes or so, and I poured parts A and B into separate cups and put those into the vacuum chamber to pull out the initial bubbles from shipping and handling. Next I mixed the two parts and then degassed the mixed amount again, pulling out every last bubble because I had plenty of time to work in. (Yes, I degassed twice and the whole thing took awhile and was a lot of work.) Then I poured my resin into the molds and let them cure.
And hey, it does suck out the bubbles. Silicone and resin tend to be very bubbly substances when you get them in the mail, and you introduce more bubbles with mixing and stirring. If you’ve ever cast dice without a pressure pot or vacuum chamber, you’ll know the microbubbles inside all too well. And the vacuum chamber eliminates those! Hooray!
But you know what it doesn’t eliminate? Air bubbles that get trapped in pouring between corners, points, faces, and numbers. Rybonator did a video comparing pressure pots and vacuum chambers where he demonstrates degassing the resin while it’s in the mold, which becomes a very messy experience. You have to degas the resin outside of the molds where the bubbles have room to escape (assuming you have a decent pot life because the process takes several minutes) and then when you pour it, welp, you get what you get.
Which is this:
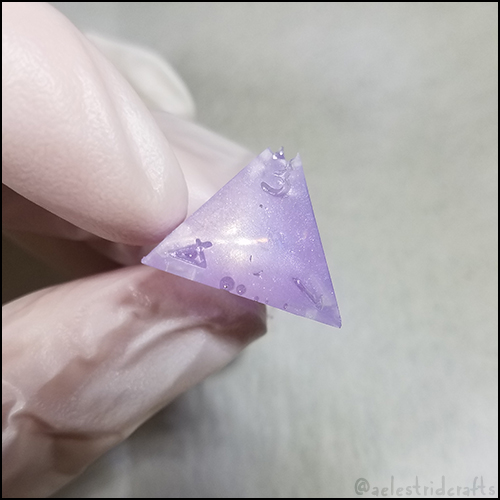
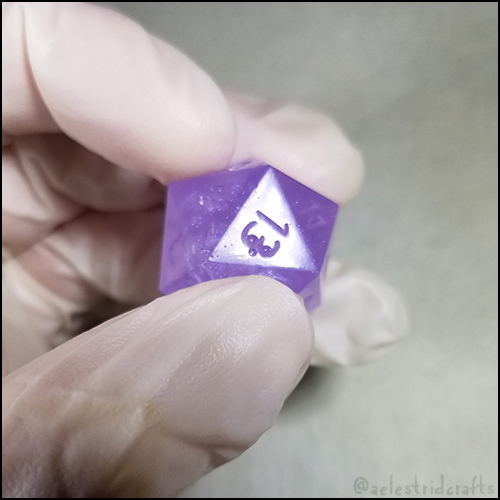
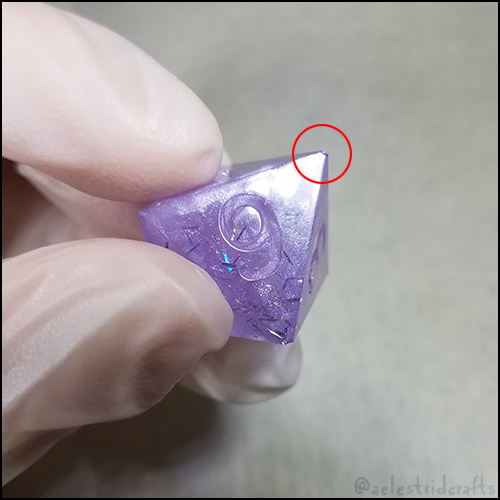
Bubble free on the inside, but you can see the outsides have a few noticeable problems. Because of issues like this, I really can’t recommend using only a vacuum chamber to degas resin and silicone. It does remove bubbles, but it can’t remove them all, and that is where a pressure pot comes in.

I’m sure you can guess at the process. You mix the resin and then, while it’s in the molds but before it’s started to cure, you stick the molds in the pressure pot and pressurize it. I do around 40 PSI but some people prefer anywhere from 20-45. Whatever works for you and gets good results. Again, please check out some of the many great youtube videos out there about how to set up a pot safely and how to use them.
Here are some dice made with a pressure pot and the difference it makes speaks for itself:


Clean faces, clean numbers, and perfect corners. Which means that the pressure pot is the clear winner here.
Understandably, getting a pressure pot or vacuum chamber is going to cost money and time, and that can be prohibitive to many starting out. There are plenty of tricks and techniques to help eliminate bubbles in your casts if you don’t have these, and while they do work they take a bit of effort and aren’t perfect methods.
The fact is, if you want clean and professional (and sell-worthy if that’s where you want to take this) dice, the investment is essential. But if you want playable dice for you and friends and you don’t mind a few bubbles, you can try some tricks such as warming your resin up before pouring or using an ultrasonic cleaner or other vibrating device to vibrate the bubbles out. The issue with dice is that because the molds are enclosed, bubbles don’t have the chance to work themselves out or anywhere to go to escape. In flat pieces of resin you can run a torch over the top or toothpick poke the bubbles on the surface but that won’t work for enclosed dice. That’s why pressure pots are so essential to the process of making bubble free dice.
Questions? Comments? I’m here all day!
Leave a Reply